Appendix: Agent Installation Instructions
Here are the steps to install the agent on the login node of M:Arthur.
1. Introduction
This procedure is for installing the agent used for M:Arthur in your environment.
This procedure is to be performed only on the login node (administrative node).
OpenPBS or Slurm must already be installed to perform this procedure.
For other prerequisites, please refer to Appendix: Assumed Settings.
Please install the agent by following the procedure from 2. below.
If you are using Proxy, please follow steps 2.~4. and then 5. after our work.
2. (Customer Work) Confirmation of Prior Information
After you provide us with the administrator’s email address and other information, our representative will send you the login node information. Please make sure you have the following information on hand. ID will be issued for each login server.
- Information we will send you
- ActivationCode
- ActivationId
3. (Customer Work) Agent Installation
Please install the agent according to the procedure of 3.1.~3.2.
3.1. Agent Installation
(In the case of Ubuntu)
$ mkdir -p /tmp/ssm
$ curl https://s3.amazonaws.com/ec2-downloads-windows/SSMAgent/latest/debian_amd64/amazon-ssm-agent.deb -o /tmp/ssm/amazon-ssm-agent.deb
$ sudo dpkg -i /tmp/ssm/amazon-ssm-agent.deb
(In the case of AlmaLinux / Rocky Linux 8)
$ sudo dnf install -y https://s3.amazonaws.com/ec2-downloads-windows/SSMAgent/latest/linux_amd64/amazon-ssm-agent.rpm
$ sudo dnf install -y https://amazoncloudwatch-agent.s3.amazonaws.com/redhat/amd64/latest/amazon-cloudwatch-agent.rpm
Tips
If you are using a Proxy, please execute the following command to register the Proxy settings.
sudo systemctl edit amazon-ssm-agent
After executing the above command, please enter the following information: In the hostname, port section, please enter the information of your proxy.
If your proxy does not support https, the https_proxy field should be http://. There is no need to change the no_proxy field.
[Service]
Environment="http_proxy=http://hostname:port"
Environment="https_proxy=https://hostname:port"
Environment="no_proxy=169.254.169.254"
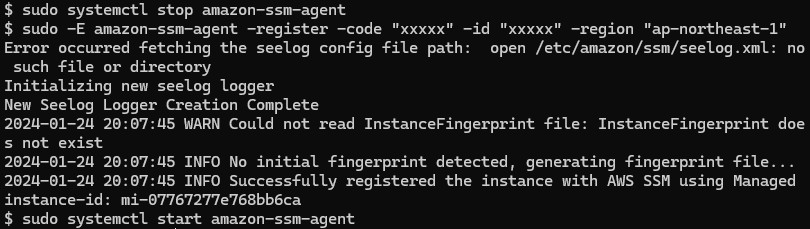
3.2. amazon-ssm-agent activation
Execute the following command. Enter the information we have given you in the optional -code and -id fields.
$ sudo service amazon-ssm-agent stop
$ sudo service amazon-ssm-agent status ## Confirm stop
$ sudo -E amazon-ssm-agent -register -code "xxxxx" -id "xxxxx" -region "ap-northeast-1"
$ sudo service amazon-ssm-agent start
$ sudo service amazon-ssm-agent status ## Confirm startup
(Example of Execution Result)
After execution, please check if the service is started.
$ sudo service amazon-ssm-agent status
● amazon-ssm-agent.service - amazon-ssm-agent
     Loaded: loaded (/lib/systemd/system/amazon-ssm-agent.service; enabled; vendor preset: enabled)
     Active: active (running) since Mon 2024-04-01 05:40:58 UTC; 1 weeks 4 days ago
Please note the instance-id in the output result of running amazon-ssm-agent, mi-07767277e768bb6ca in the above sample.
4. (Customer Work) Share Your Registration Information with Us
When you have completed the above work, please provide the following information to Morgenrot.
We will contact you after our work is complete.
- The instance-id (mi-xxxx) issued at the time of activation
- Host name (contents of /etc/hostname)
- Your preferred job scheduler (OpenPBS/Slurm)
5. (For Proxy Customers Only) Add Proxy Settings
Tips
If you are using a proxy, please remove the commented-out part in the following file and enter the proxy settings after our work.
- File to be edited
/opt/aws/amazon-cloudwatch-agent/etc/common-config.toml
- Before common-config.toml change (initial state)
## Configuration for proxy.
## System-wide environment-variable will be read if it is absent here.
## i.e. HTTP_PROXY/http_proxy; HTTPS_PROXY/https_proxy; NO_PROXY/no_proxy
## Note: system-wide environment-variable is not accessible when using ssm run-command.
## Absent in both here and environment-variable means no proxy will be used.
# [proxy]
#    http_proxy = "{http_url}"
#    https_proxy = "{https_url}"
#    no_proxy = "{domain}"
- After modifying common-config.toml
## Configuration for proxy.
## System-wide environment-variable will be read if it is absent here.
## i.e. HTTP_PROXY/http_proxy; HTTPS_PROXY/https_proxy; NO_PROXY/no_proxy
## Note: system-wide environment-variable is not accessible when using ssm run-command.
## Absent in both here and environment-variable means no proxy will be used.
[proxy]
http_proxy = "http://hostname:port"
https_proxy = "https://hostname:port"
no_proxy = "169.254.169.254"
- After making the change, restart the service with the following command.
sudo systemctl restart amazon-cloudwatch-agent
This completes the installation process.
You can now begin operations in accordance with the User Guide.