How to Operate the Administrator
M:Arthur allows for two types of users: administrators and users.
Administrators are granted administrative privileges. This section describes how to operate as an administrator.
When you install M:Arthur, at least one administrator will be initially registered during the installation process.
The registered administrators will be able to use M:Arthur.
1. Basic Administrator Operations
Administrators can register new users and servers. Once registered, these users and servers can be used in M:Arthur.
Basic administrator tasks can be accessed from the menu bar on the left side of the 【M:Arthur】 screen (called the left menu bar).
Under the 〈Setting〉 section of this menu, you’ll find the 〈Server〉 and 〈User〉 options. Click on these to start managing servers and users.
2. Create a Server Group
Before registering a server, you need to create a server group. A server group is a collection of individual servers. First, create the server group, then register servers by assigning them to the group.
To create a server group, select 〈Setting〉, then 〈Server〉 from the left menu bar. Then select the 《Group》 tab at the top of the screen, and click the [+Add Server Group] button on the right.
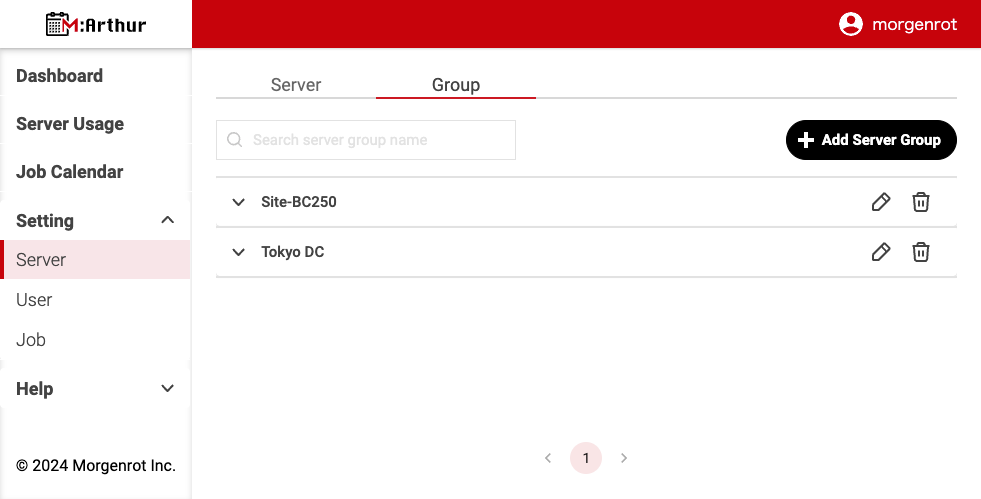
【Add a New Server Group】 screen will appear.
To create a server group, enter the required information and click the [Add] button at the bottom.
If you want to cancel, click the [Cancel] button.

A summary of each item is as follows
| Item Name | Description |
|---|---|
| Group Name | The display name of the server group. This can be set freely. It is a required field. |
| Note | Remarks field of the server group. You can set this field as you wish. |
3. Register a Server
To register a server, select 〈Setting〉, then 〈Server〉 from the left menu bar. Then select the 《Server》 tab at the top, and click the [+Add Server] button on the right side.
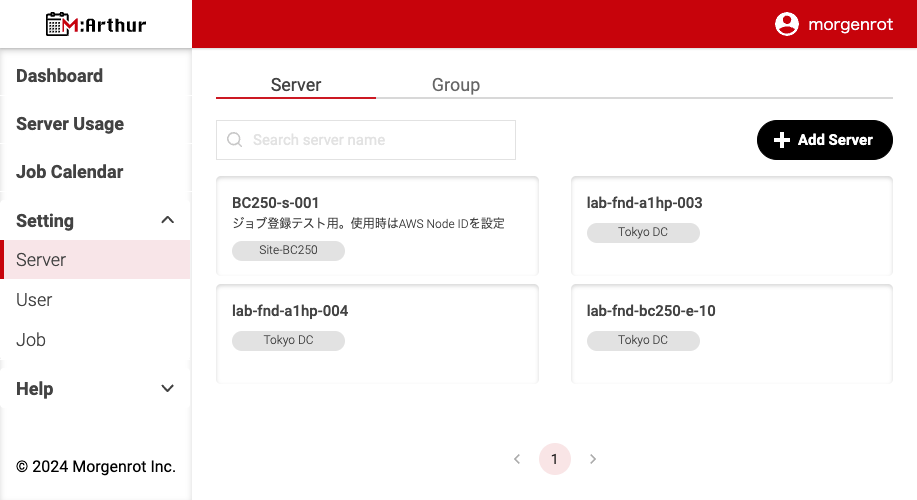
The【Add a New Server】 (server registration screen) will appear.
To register a server, fill in the required information on the screen and click the [Add] button at the bottom.
To cancel the operation, click the [Cancel] button.
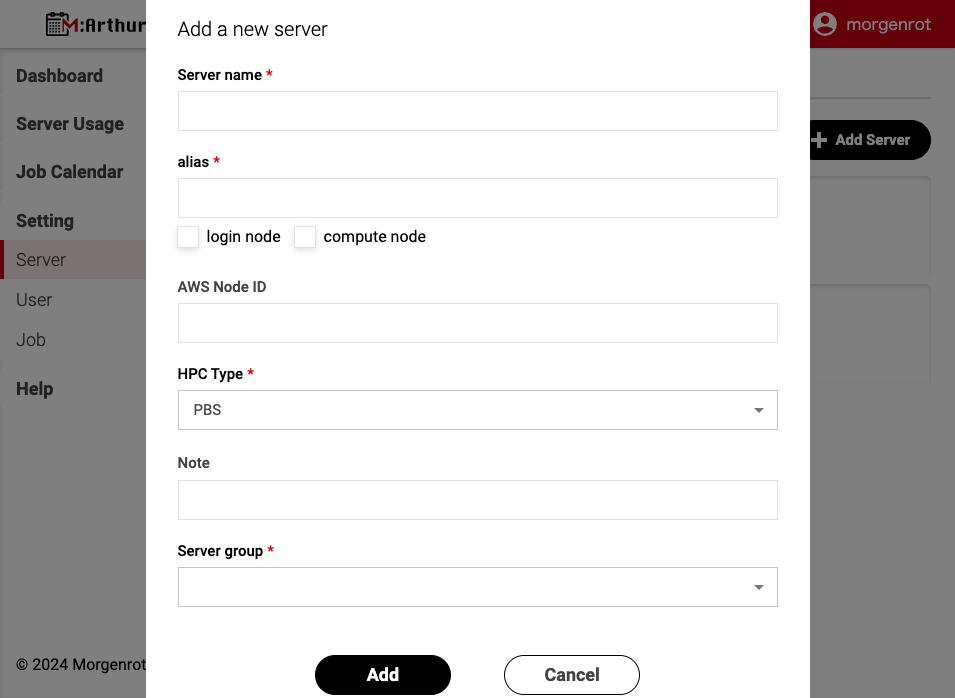
A summary of each item is as follows
| Item Name | Description |
|---|---|
| Server Name | The display name of the server. You can fill in this field freely. It is a required field. |
| Alias | M:Arthur will use the information in the Alias field as the basis for linking to the process. Please make sure to enter the correct OS hostname. This field is required. |
| Login Node / Compute Node | Specify the login node (administrative node) or compute node. Either or both can be selected. |
| AWS Node ID | This is the ID for the server to work with M:Arthur. Only the login node (managed node) needs to be filled in. |
| HPC Type | Select the management tool for the job, either PBS (for OpenPBS) or SLURM (for Slurm). This is a required field. |
| Note | Remarks for the server. You can fill in freely. |
| Server Group | Select the server group to register. At least one server group must be registered in order to register a server. This field is required. |
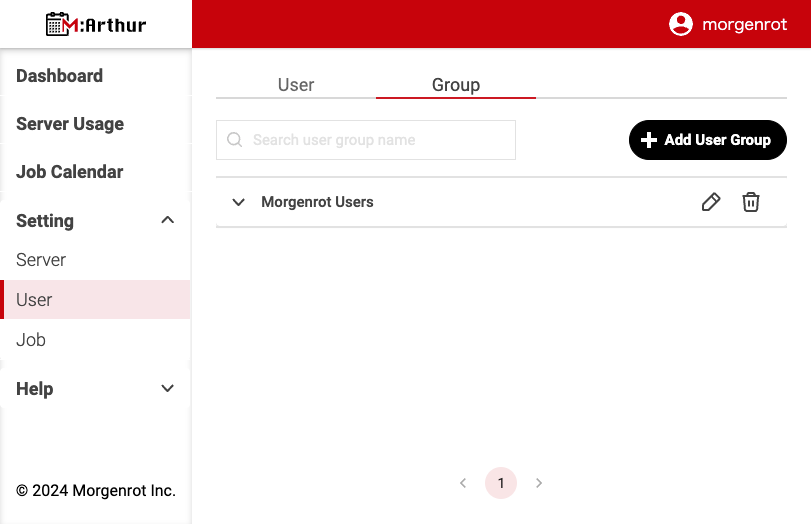
4. Create a User Group
In order to register users, user groups must first be registered. A user group corresponds to a grouping of individual users. First, user groups are created, and then users are registered by linking them to user groups. To register a user group, select 〈Setting〉, then 〈User〉 from the left menu bar. Then select the 《Group》 tab at the top of the screen, and click the [+Add User Group] button on the right.
The【Add a New User Group】 (user group creation screen) will appear.
To create a user group, fill in the required information on the screen and click the [Add] button at the bottom.
To cancel the operation, click the [Cancel] button.
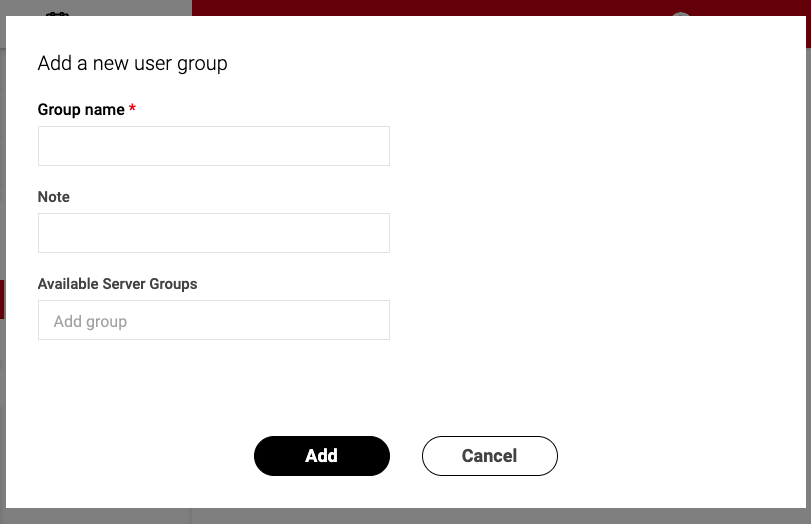
A summary of each item is as follows
| Item Name | Description |
|---|---|
| Group Name | The display name of the user group. You can fill in this field freely. It is a required field. |
| Note | Remarks field of the user group. You can fill in this field freely. |
| Available Server Groups | Set the server groups that the user group can use. Multiple selections are allowed. Users belonging to the user group can use the servers in the server group set here. |
5. Register a User
To register a user, select 〈Setting〉 on the left menu bar, then 〈User〉, and then click the [+Add User] button on the right side.

The【Add a New User】 (user registration screen) will appear.
To register a user, fill in the required information on the screen and select the [Add] button at the bottom.
To cancel the operation, click the [Cancel] button.
(In 【Add a New User】, scroll down the screen and fill in the form.)


A summary of each item is as follows
| Item Name | Description |
|---|---|
| Account Name | The display name of the user. You can fill in this field freely. It is a required field. |
| Profile Image | You can set a profile image. Click the[Remove] button to delete the registered image. |
| Alias | M:Arthur uses the information in the Alias field as the basis for processing. Be sure to enter the correct OS user name. This field is required. |
| Email Address | The user’s email address. This will also be used as the login ID for M:Arthur. The account registration information will be notified to the corresponding e-mail address. This field is required. |
| Password / Password (confirmation) | The user’s password, used to log in to M:Arthur. The user will be notified of the set password by e-mail. The password must be at least 8 characters long and contain upper case alphabets, lower case alphabets, and numbers. Required field. |
| Authority | Sets the user’s authority. The following two types of values can be set. ・ Administrator: Allows users and servers to register, edit, and delete users and servers. Can also check the status of jobs and submit jobs. ・ User: Allows you to check the status of jobs in the group you belong to and submit jobs. It is a required field. |
| Time Zone | Select the time zone of the user. This field is required. |
| User Group Name | Select the user group to which the user belongs. You may select more than one. At least one user group is required to register a user. This field is required. |
Tips
At the beginning of use, the initial administrator account is set as follows.
For user group 「admin」 and server group 「default」, please refer to 2. Create a Server Group and 4. Create User Groups
- Initial Settings for Administrator Account
| Item Name | Initial Settings |
|---|---|
| Account Name | The part before @ of the e-mail address you provided in advance (local part) |
| Profile Image | (No registration) |
| Alias | Hostname of the login node you provided us in advance |
| Email Address | Email address you provided in advance |
| Password | Password issued at initial registration (notified by email) |
| Authority | Administrator |
| Time Zone | Asia/Tokyo(UTC+9) |
| User Group Name | admin |
- Initial Settings for User Group 「admin」
| Item Name | Initial Settings |
|---|---|
| Group Name | admin |
| Note | (No description) |
| Available Server Groups | default |
- Initial Settings for Server Group 「default」
| Item Name | Default Settings |
|---|---|
| Group Name | default |
| Note | (No description) |
- Initial Settings for Server
(Initially, one server is registered based on the information you provided in advance.)
| Item Name | Initial Settings |
|---|---|
| Server Name | The hostname of the login node you provided in advance. |
| Alias | Hostname of the login node you provided in advance |
| Login Node / Compute Node | Login Node only |
| AWS Node ID | ID provided at the time of agent installation |
| HPC Type | Scheduler that you provided during the agent installation |
| Note | (No description) |
| Server Group | default |
These are the operations that only administrators can perform.
7. License Management (Configuring Usage Servers)
This function is intended only for organizations where the License Management function is enabled.
For organizations utilizing License Management, you can set the servers to be used based on the registered license information (validity period and node count).
In the relevant organizations, the 〈License〉 menu is displayed within 〈Setting〉 in the left menu bar, and clicking this will navigate to the License Management screen.
The administrator needs to select the license and allocate the usage servers from the editing screen.
To configure usage servers, first select the target license from the 【License List】.
The list displays the registered licenses, the upper limit of available servers, and the current usage count.
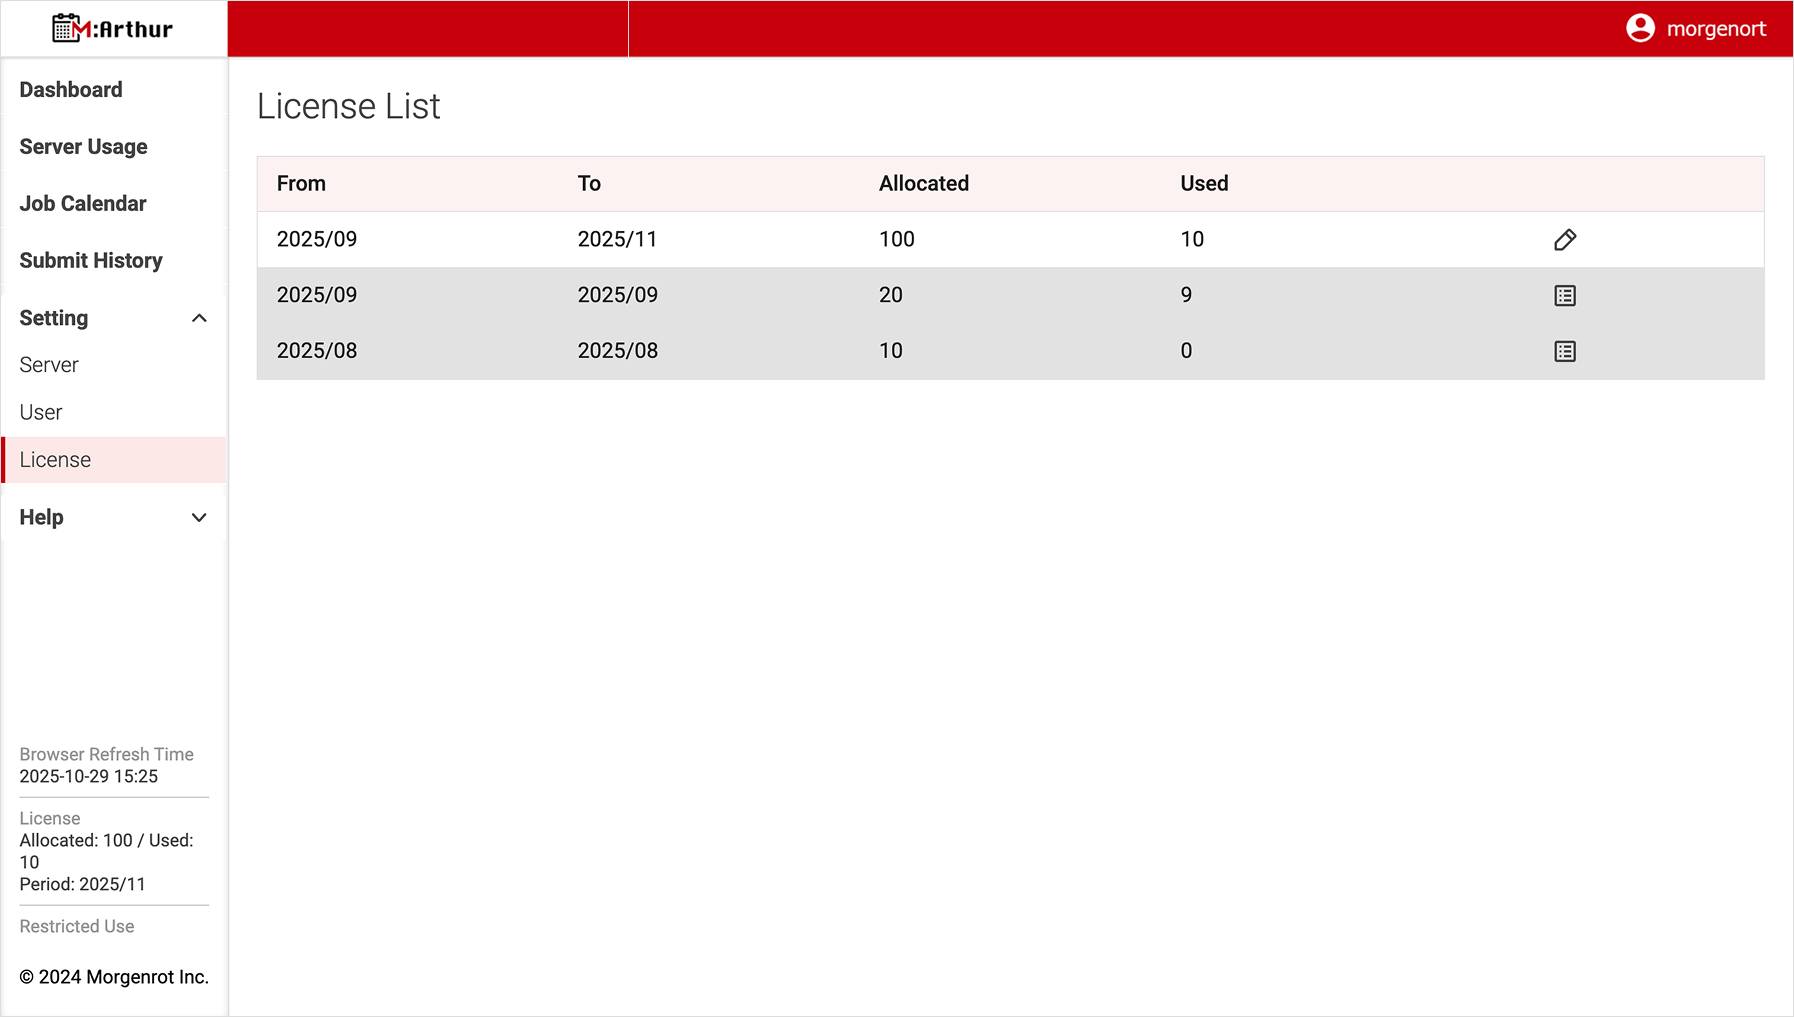
A summary of each item is as follows:
| Item | Description |
|---|---|
| From | The starting month of the license validity period. |
| To | The ending month of the license validity period. |
| Allocated | Displays the upper limit of available servers. |
| Used | Displays the currently used server count. |
| Edit Button (Pencil) | Opens the detailed screen and allows you to change the target servers, etc. |
| Details Button (Document) | Displayed for expired licenses. Opens the detailed screen, but editing is not available. |
Click the [Edit Button] (pencil icon) displayed on the right side of the corresponding license row in the 【License List】 to navigate to the 【Edit License】 screen where you can configure the usage servers.
Select the servers to be allocated from the server list displayed under “Target Server” on the screen.
Additionally, by clicking the [Import] button in the upper right corner of the screen, you can configure the allocation by inheriting the settings from the most recent license allocation information.
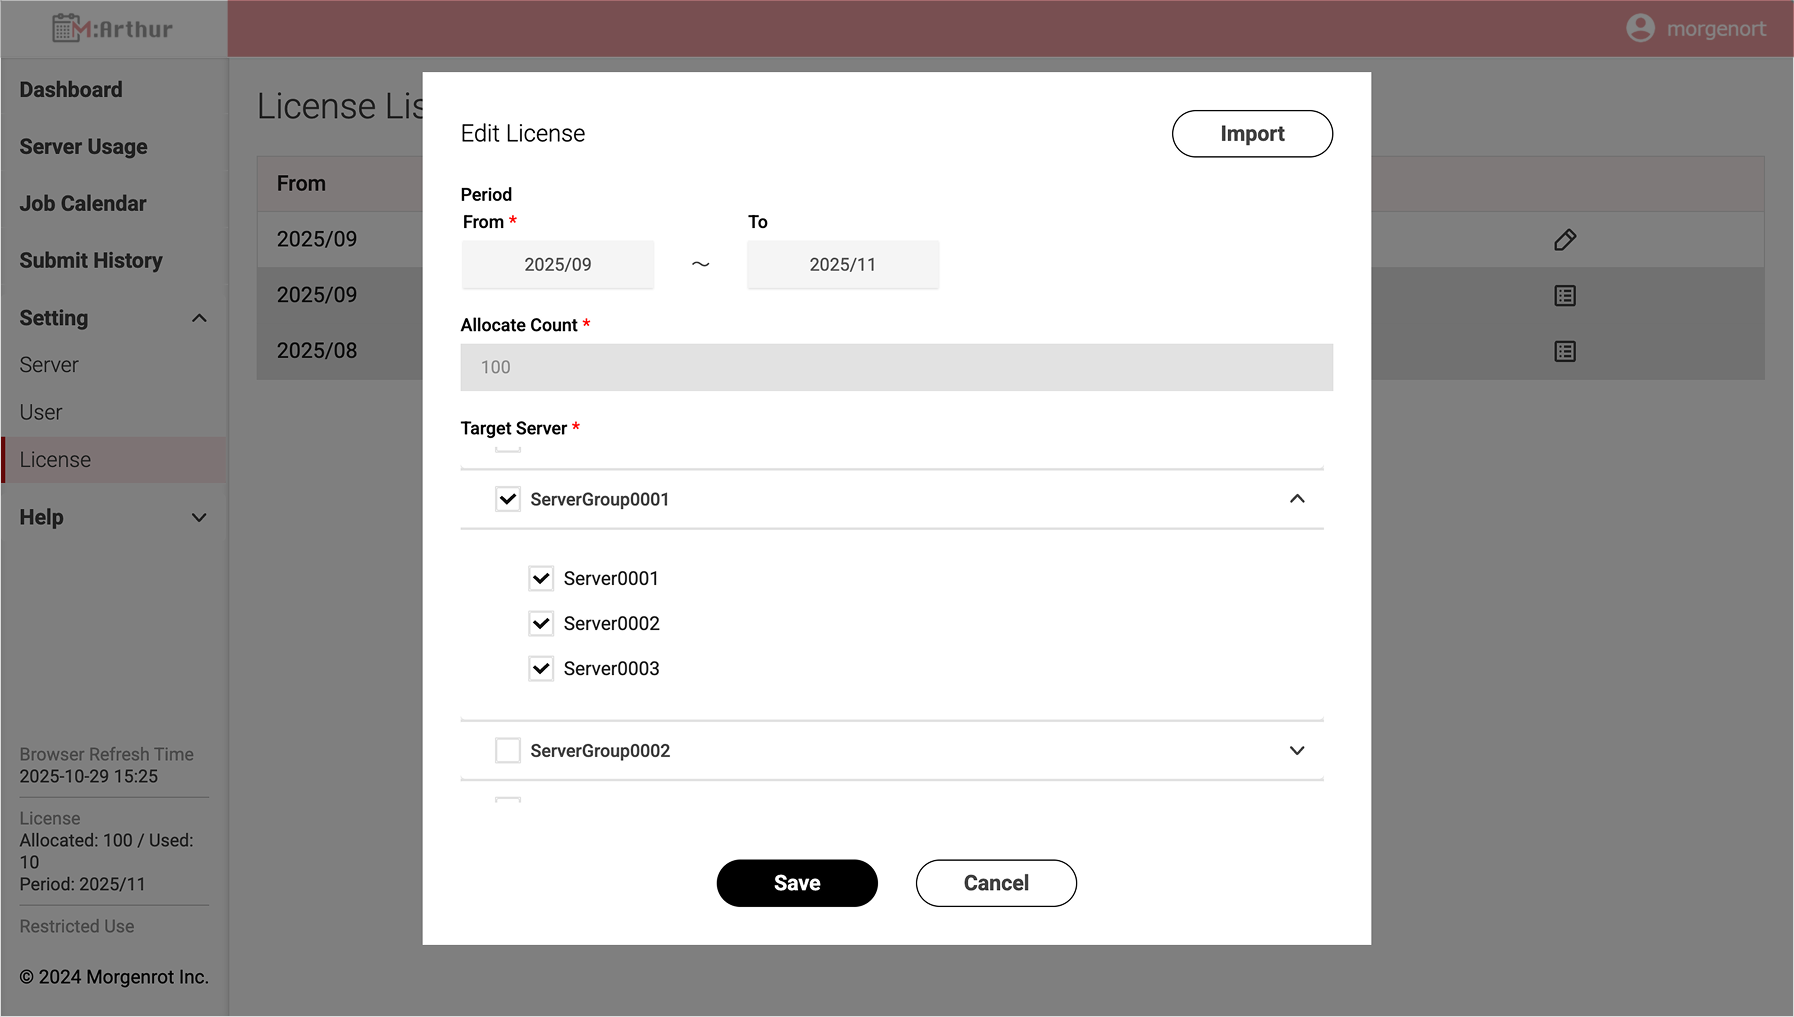
A summary of each item is as follows:
| Item | Description |
|---|---|
| Import | Applies the settings from the most recent license allocation information. A confirmation dialog will be displayed. Confirm and proceed with execution. |
| From | The starting month of the license validity period. |
| To | The ending month of the license validity period. |
| Allocate Count | Displays the upper limit of available servers. |
| Target Server | Select the target servers to be allocated. |
| Save | Applies the configured settings and returns to the list screen. |
| Cancel | Discards the configured settings and returns to the list screen. |
Notice
The period and upper limit of servers for the registered license cannot be changed.If you wish to make changes, please contact us here as various conditions apply.
Tips
In the following functions, only the servers specified in License Management are displayed/available for selection,
and servers whose validity period has expired will not be displayed in subsequent periods.
Past history remains visible even after the expiration date.
- Dashboard
- Server Usage
- Job Calendar
Tips
For organizations with License Management enabled, the current status is displayed at the bottom of the side menu.
- Allocated: Upper limit of servers
- Used: Current usage count
- Period: Validity period
- License expired: Displayed only when the license has expired